 CentOS7の構築記録
環境はESXi
まずは仮想マシンを用意。
インストール
![]()
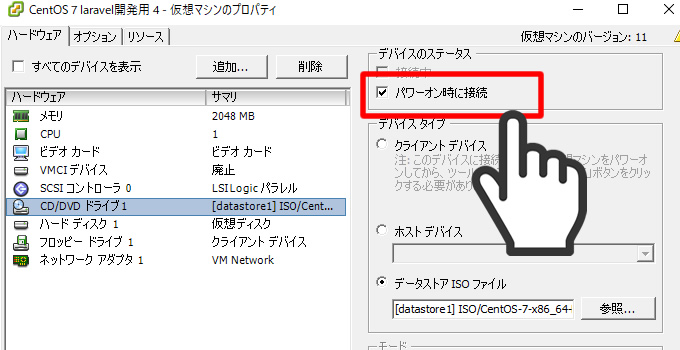 ISOを仮想ドライブに入れても、パワーオンしないとダメです。
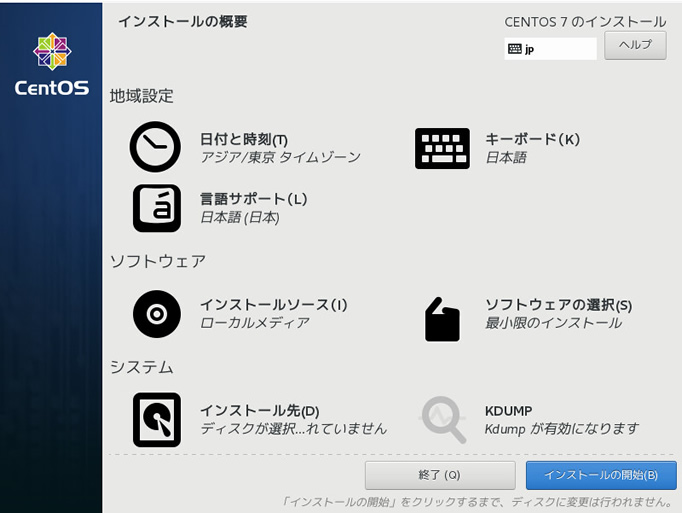
あとは普通にインストール。つまづくポイントはなし。
初期設定
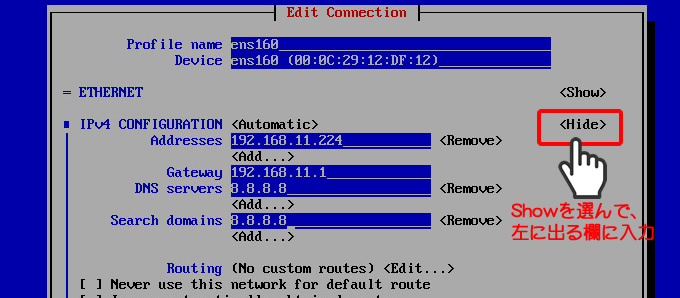
ネットワーク設定 IPアドレスを設定する。方法は2つ。
numtuiで設定する方法と今まで通りのコンフィグで設定する方法。
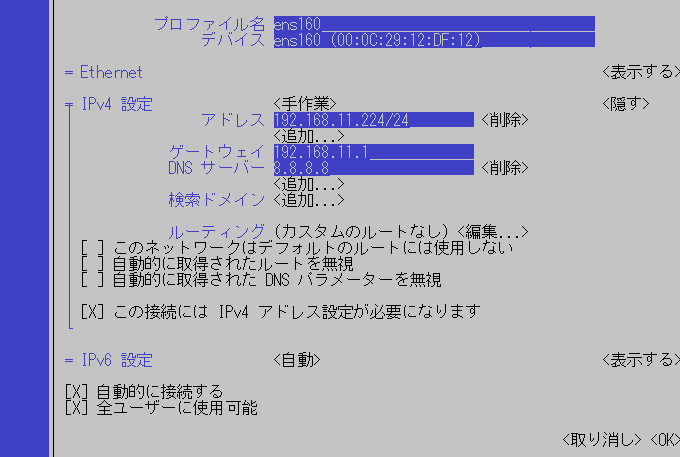
方法1 nmtuiで設定する。
# nmtui
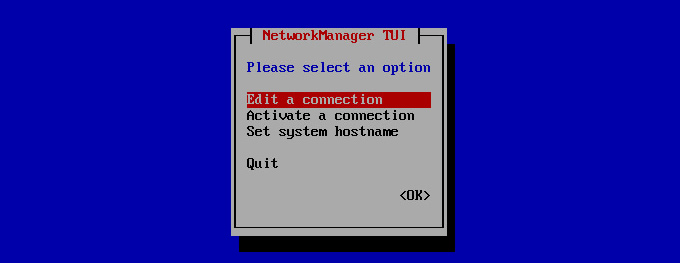
設定が立ち上がるので、Edit a connection を選択。
# ip addr
RHEL7/CentOS7では、net-toolsを「deprecated(廃止予定)」としており、今後は、iproute2パッケージに含まれる「ip」「ss」などのコマンドが推奨。なのでIP確認はipconfigでなく ip addr ね。ちなみに
# yum -y install net-toolsとすれば使えるが、よくない(´・ω・)
またSearch domeins は空で。
またIP接続できた時点で外部からSSHのほうが日本語で楽です。
方法2 今まで通りコンフィグ設定する
省略
レポジトリ設定
# yum install epel-release
#yum install http://rpms.famillecollet.com/enterprise/remi-release-7.rpm
remiリポジトリの公開鍵を取り込む
#rpm --import https://rpms.remirepo.net/RPM-GPG-KEY-remi
remiリポジトリの公開鍵を取り込む必要があるか?
※あと確認、自動で入ってるような……yum と rpm の違い
なぜ二つもパッケージを管理するコマンドが用意されているのか?」という疑問、「rpmとはパッケージ個々」であり「yumはrpmを管理するマネージャ」である。両者共にパッケージを管理しているが、言わば管理する単位とその立ち位置が違う。
rpmファイルも個々に依存関係を記述したファイルを内包しているが、自動的に依存関係を管理してインストールするというものではない。あくまでも単体のパッケージである。
そのrpmパッケージを統合管理するのが「yum」の役割となる。リポジトリという、rpmがほうりこまれているプールのなかを検索しrpm個々の情報を参照して依存関係を解決し統合的な管理をするのが「yum」となる。
参照:https://eng-entrance.com/linux-package-rpm-yum-def

終わったらreboot 後、yum update
なぜかアップデートを動作がおかしく、リブート後アップデートができた。
WEBサーバ Apachのインストール
#yum install httpd httpd-devel mod_ssl

起動と自動起動

# systemctl enable httpd.service
# systemctl start httpd.service

ファイヤーウォールの設定
# firewall-cmd --permanent --zone public --add-port 80/tcp
# firewall-cmd --reload

PHPのインストール
# yum install --enablerepo=remi,remi-php70 php php-devel php-mbstring php-pdo php-gd
ちなみに php.iniの場所
vi /etc/php.ini
これも入れとく
#yum install php-mysqlnd
MariaDBインストール
# yum -y install mariadb-server
MariaDB設定ファイル編集
vi /etc/my.cnf.d/server.cnf
# These groups are read by MariaDB server.
# Use it for options that only the server (but not clients) should see
#
# See the examples of server my.cnf files in /usr/share/mysql/
#

# this is read by the standalone daemon and embedded servers
[server]

# this is only for the mysqld standalone daemon
[mysqld]

#■ 文字コードをUTF-8 下記追加
character-set-server = utf8

# this is only for embedded server
[embedded]

# This group is only read by MariaDB-5.5 servers.
# If you use the same .cnf file for MariaDB of different versions,
# use this group for options that older servers don't understand
[mysqld-5.5]

# These two groups are only read by MariaDB servers, not by MySQL.
# If you use the same .cnf file for MySQL and MariaDB,
# you can put MariaDB-only options here
[mariadb]

[mariadb-5.5]
————————————————————————-
MariaDB起動
# systemctl start mariadb
MariaDB自動起動設定
# systemctl enable mariadb
DBの初期設定
—————————————————————————
初期設定
#mysql_secure_installation
# mysql_secure_installation

NOTE: RUNNING ALL PARTS OF THIS SCRIPT IS RECOMMENDED FOR ALL MariaDB
SERVERS IN PRODUCTION USE! PLEASE READ EACH STEP CAREFULLY!

In order to log into MariaDB to secure it, we'll need the current
password for the root user. If you've just installed MariaDB, and
you haven't set the root password yet, the password will be blank,
so you should just press enter here.

Enter current password for root (enter for none):
OK, successfully used password, moving on...

Setting the root password ensures that nobody can log into the MariaDB
root user without the proper authorisation.

Set root password? [Y/n] y
New password: パスワード入れる。
Re-enter new password: また入れる。
Password updated successfully!
Reloading privilege tables..
... Success!


By default, a MariaDB installation has an anonymous user, allowing anyone
to log into MariaDB without having to have a user account created for
them. This is intended only for testing, and to make the installation
go a bit smoother. You should remove them before moving into a
production environment.

Remove anonymous users? [Y/n]  y もしくはENTERキー
... Success!

Normally, root should only be allowed to connect from 'localhost'. This
ensures that someone cannot guess at the root password from the network.

Disallow root login remotely? [Y/n]  y もしくはENTERキー
... Success!

By default, MariaDB comes with a database named 'test' that anyone can
access. This is also intended only for testing, and should be removed
before moving into a production environment.

Remove test database and access to it? [Y/n]  y もしくはENTERキー
- Dropping test database...
... Success!
- Removing privileges on test database...
... Success!

Reloading the privilege tables will ensure that all changes made so far
will take effect immediately.

Reload privilege tables now? [Y/n]  y もしくはENTERキー
... Success!

Cleaning up...

All done! If you've completed all of the above steps, your MariaDB
installation should now be secure.

Thanks for using MariaDB!
phpMyAdminを入れる
普通にダウンロードしてアップ。
mysqli 拡張がありません。PHP の設定をチェックしてみてください
See our documentation for more information.
下記、引用を入れる。#yum install php-mysqlnd #yum -y install php-mysqlそしてWEB再起動
systemctl restart httpd.service
WEB再起動
systemctl restart httpd.service
参考:php7インストール
https://qiita.com/inakadegaebal/items/b57cf10339978d638305
データベースサーバー構築(MariaDB)
https://centossrv.com/mariadb.shtml
CentOS 7 に PHP 7.1 と phpMyAdmin をインストール